Showing posts with label tutorial. Show all posts

Saturday, 17 August 2013

The Pageboy Tutorial

Ever since I used curling tongs to create a lovely Pageboy hairstyle, I have been determined to teach myself how to do the same style but by setting, a much more hair friendly method. Like all vintage setting styles, practise makes perfect but I have found this quite an easy one to do as there are only six sections to set. I use rollers to set my hair, rather than pin curls as I must admit that I still have to master that technique! Rollers give a great heat free styling option that works every time once you know where to put the rollers to work for you.
I must also add that when I compare pictures of my Pageboy done by a set and curling tongs, the set picture looks much more authentic!


To begin the set, separate the hair into six sections. This can depend on how thick the hair is, but I do have very thick hair and this method works fine.
Part your hair as you would normally. I always begin with the smaller side which my fringe isn’t on as there is normally a little bit less hair.
  1. Section One: Hair from just in front of the crown parted diagonally to the point at the tip of the ear.
  2. Section Two:  I imagine a vertical line down from the point near the crown that I began section one from, to the hairline at the base of the neck.
  3. Section Three:  A semi circle of hair around the crown that will mainly be backcombed
  4. Section Four:  A rectangle underneath the hair in section three.
  5. Section Five:  Take the hair out that will be in your fringe and part in a similar way to Section One.
  6. Section Six: This should be the remaining hair just behind the ear on the fringe side.
 I use rollers that I recently bought from Boots for around £2 (these are them!). I add a large foam roller for the section at the crown as this gives a looser set to get the dramatic U shape of a Pageboy set. Don’t forget a spray or two (or three!) of setting lotion before putting the rollers in!
 
Now comes for the scary bit, adding the rollers. My top tip here is to really think about the end result when adding the rollers. Think of the classic U Shape of the pageboy and roll the hair to recreate this. To put the rollers in Sections One and Two, I roll the hair upwards with the plastic bit of the roller at the bottom.  I like to end up with the rollers fastened in place vertically to almost create a ringlet once taken out later. I use the same technique for Sections Five and Six except I find it easier to have the plastic securing bit of the roller at the top, because I am right handed it helps me to secure the roller in really tightly. For Section Four, I do sometimes add two rollers, to continue the U shape well for both sides of the head, however it does work fine with one. Put the roller in, rolling it up underneath. I sometimes slightly twist the roller so that the hair is slightly more set to the side which has least hair. If I do this, I then add the roller for Section Three slightly twisted in the opposite direction to that of Section Four. I hope this makes sense! My thinking is that the U shape will be a continuation along the hairline, rather than the hair parting down the back and falling to each side.

Add a quick blast of hairspray and a headscarf and get some beauty sleep!
The beauty of this set is that it is relatively quick and easy to style in the morning as the curls are quite large and loose. Remove all rollers very carefully and I generally encourage the hair back into ringlets once the rollers are out. You should look very old fashioned with a head of ringlets! I then take a large round bristle brush and gently brush underneath the hair to loosen the set. I use my other hand (that isn’t holding the brush) to smooth and shape the hair up and under into the pageboy style. If you get any fluff, don’t worry, just keep brushing out and smoothing around and underneath and you will be perfectly pageboyed! A little backcombing to Section Three and sorting the fringe, however you would like seals the deal and you are ready to go!

I hope you find this useful, and would love to hear how you get on!

Hannah xxx

Saturday, 27 July 2013

Headscarves and Beehives

Another addition to the vintage hairstyling posts of late is another easier style to pull together. This is a very frequent look that I wear. It is really easy to do, hides a multitude of grease/freshly washed hair sins and maintains a great fifties look. 


The key to mastering this look is the right amount of beehive, with a small French twist at the back. I scoop my hair into a roll with my right hand, and use my left hand to pin it in place. I tend to do this style in freshly washed hair, as you can just shove as many pins in to hold everything in place and get a days wear ready for a good set. The fringe requires slightly more modern day styling; those faithful curling tongs and plenty of backcombing and hairspray! I then roll the longer fringe bits into a small kiss curl and off I go!
 
I seem to be collecting a lot of headscarves, and buy most from Boo Boo Kitty Couture. They are quite honestly the perfect size, colours and material to get a great look very easily!
 
I recently bought a 1940's hairstyle book and am trying a few of those looks out, keep your eyes peeled for another hair post coming soon!
 
Hannah xxx

Monday, 15 July 2013

Bumper Baby!

Since watching How to Marry a Millionaire, I have been obsessed with everything Betty Grable! From her hair and make up to incredible legs, I have been really inspired by her. I stumbled across this image of her and was struck with inspiration and decided to try a modern replica of this look.


I decided to try a loose set with a more modern bumper bang and headscarf. The standard bumper bang look is widely recreated in vintage circles, but it is a look I have struggled to replicate! I was using a hair doughnut, purchased from Boots and really struggled to catch all of my hair in the roll. A trip to Simon Webster Hair later, and I had it sorted! It seems the doughnut that I was using was far too big and so I wasn't getting as tight of a roll as I needed. They recommended that I buy one of those and cut it in half. The right sized doughnut that I now use is pictured below.


I find that this style works better on greasier hair (as do vintage styles) as the hair has lots more hold. To form the bang, separate the hair like in the picture below. I find it best to stop slightly before you reach the crown to ensure that there is still some volume at the back.

Please excuse my hair fresh out of the set!

Then comes the tricky part. Take the doughnut and roll the hair under, as you would with a long foam roller. It may take a few attempts but hold out to get a great outcome! I ran a slight bit of pomade over the fringe I rolled up to keep any stray hairs in place. There is then a little multi tasking were you need to hold the fringe in place but also secure each end of the roll with a long pin me down grip (click here to see). Once the ends are secure you are free to let go and pin away. To cover the ends of the doughnut, simply slide the hair along and you may need to pin some looser bits down. Once everything is secure, you can gently press on the bang to bring it slightly lower down the face.
 
Add a sweet headscarf or bow for a fun look perfect for the summer days!
 
Ta Da!
 
 
 Good luck, and I would love to see your attempts! Tweet me @ABrightonBelle_!
 
Hannah xxx


Wednesday, 19 June 2013

Hey Pageboy!

Whilst I normally favour a set, victory roll or hide beneath a brightly coloured headscarf, last Saturday I had a little time on my hands and decided to try a new hairstyle. I have recently rediscovered my love for Dita Von Tease's' perfect waves and modern pageboy hairstyle, and thought I would give it a go. 

...Sigh, these are all so perfect!
 
I hadn't set my hair the night before (lazy!) so decided to also pin curl it first using my curling tongs. I separated my hair into three sections, back and two sides, and then curled big chunks of hair towards my face. Tip- a little hairspray before using the tongs works a treat! I would say I got three pin curls per each section of hair. Immediately after releasing my hair from the tongs, I rolled them into the pin curl in the direction that I wanted the curl to be, secured with a Kirby grip and gave a quick spray of hairspray. The most important part of heat styling is to allow the pin curl to fully cool before releasing it.
 
 After doing my make up, I released the pin curls and gently brushed the curls out with my Kent brush. I tried to brush the individual pin curls out so that they merge with the other pin curls from that section of hair. I then rolled them underneath and secured with a Kirby grip, another blast of hairspray and 'et voilĂ !'
 
 
I am really happy with how it turned out, especially considering it was my first attempt! I think this will be a perfect hairstyle for when my hair gets a little longer as I will be able to embrace Dita's look completely. I am not keen on constantly using curling tongs as I am petrified that I will kill my hair, so plan to try doing this style with a set. I will tweet and update my Facebook with how I get on!
 
Hope you like it and I would be grateful for any tips!
 
Hannah xxx
 

Sunday, 12 May 2013

I Want To Ride My Bicycle

A wet and windy Sunday in Brighton left me undefeated and I hit the town with my trusty bicycle. Yesterday I tweeted mentioning that I had purchased a super strong hairspray and I thought the wind was a suitable to test to see if it worked!


I have been a fan of L'Oreal Elnett for years now, and found that it is great when you wish to keep changing and restyling the hair, or for hairstyles less precise than some vintage styles. However, I had recently been looking for a hairspray that will be able to keep a set or tumbling fringe in all day and Elnett wasn't quite doing it for me. I bought Schwarzkopf Silhouette from Sally's on Western Road. The black bottle is the strongest and a 300ml bottle cost me in the region of £5.


What can I say, it certainly worked! It was tested by a battle along the seafront and the picture above was taken afterwards, with everything still in place!
 
 To do this style I first curl my fringe section with curling tongs, rolling the hair towards my face. I then roll it up into a pin curl, and do my make up whilst it cools! Afterwards, take the pin curl out and gently brush the hair in the direction that you would like it go in. I choose this S shaped style. Gradually take the fringe into sections and back comb gently at the roots on the underside of the fringe-this way the front section (that everyone will see) is completely smooth. Spray a little hairspray onto each of the back combed root sections. When this is all done gently brush them all together to form a magnificent quiff. The little curl at the bottom is really easy to style as it should already be in a little ring from the curling tongs. Just roll and position this wherever takes your fancy, secure with a Kirkby grip, and another blast of hairspray should hold this too. Don't be too alarmed, because the hairspray is so strong, it takes a little longer to dry than normal. Once the more precise bits are all held in place, I then do another spray of hairspray all over the general fringe area to secure any fly away bits!

We had a severe case of jealousy looking at all of the beautiful MGs lined up on Madeira drive!

One thing that didn't work today was my pleated circle skirt, sorry residents of Brighton but you may have caught sight of my undergarments as I whizzed past you!
 
Hope you all had a wonderful weekend,
 
Hannah xxx

Wednesday, 1 May 2013

With An Arched Eyebrow

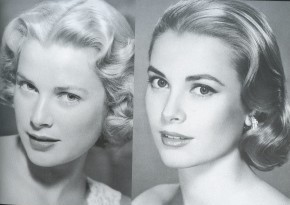
A flick of eyeliner or a shock of red lipstick are commonly seen as the staple to a classic vintage look. I believe that a classic, well shaped eyebrow really seals the deal and frames the face, look at the difference it makes to Grace Kelly!


We have all read the classic tutorial in every magazine which shows us how to use our nose to measure the three different points of the eyebrow, but it has taken me a long time to finally find a product that frames my eyes well, but keeps me well away from a scouse brow!
 
Less of this...
And more of this!


I use MUA Pro Brow Ultimate Eyebrow Kit which I got for around £3 from Superdrug. It comes with two different shade powders, highlighter, petroleum jelly, an angled brush and small tweezers, all in a cute little set with a mirror too!

 
I mix the two eyebrow powders on the top row to create a shade that emphasises the shape enough, but isn't too dark.


Here I am above, all made up but with natural brows! I am lucky to have fairly full brows, however they can be quite sparse in some places and don't really have much shape to them. They are also considerably fairer than my bright ginger hair! I begin by defining the point of my eyebrows, to were I want to highest point to be. Depending on my look, I either build these up for a more pronounced fifties look, or slightly more natural but shapely forties look.
 
 
I use my angled brush included in the kit to help define the arch. I use a stippling or dabbing motion to press the powder on, rather than sweep it on as you would with eyeshadow. Once I am happy, I then move on to fill out the thicker part nearer towards my nose. I try not to have the powder too dark and intense here to maintain a natural look, blending it from natural towards the defined arch. I then follow the natural arch and hair down to the outer point.
 
 
 And here is my finished look! I must admit to not being a fan of the current trend to almost on the shape of brows and colour them in, I do prefer a natural look that just emphasises your natural features. A quick swipe over of the included jelly can set the brows and powder in place to last all day (and all night!). I sometimes use a highlighter for a more special occasion, but use Benefit High Beam just lighted dabbed underneath the outer brow rather than a powder one which can end up all over your face.
 
I hope this is useful and I would love to hear your best eyebrow tips!
 
Lots of vintage love,
 
Hannah x


Friday, 19 April 2013

A Classic Eyeshadow Guide

Creating the perfect 1950's eye make up comes from a little more than a flick of eyeliner and mascara. I really do believe in the power of establishing a perfectly contoured base so that the eyeliner really pops and perfects the look.
 
Whilst Marilyn went for a very dramatic sweep of eyeshadow to create her iconic look, I want to show you how to create the basis of your eye make up that is good enough for your everyday vintage look. It can then be built up for a more glamorous or evening occasion.

L-R MAC Pro Longwear in Always Sunny, MAC Phloof!, MAC Sable and MAC Satin Taupe
My general go-to shades from these eyeshadows are MAC Phloof! and MAC Satin Taupe. This is a great combination for everyone to use as they are both rich, pigmented shades that can be built up to the intensity you want. As a green eyed girl, I use certain colours to enhance my eyes, for instance MAC Pro Longwear in Always Sunny and the slightly more copper shaded brown, MAC Sable.
 
I use Satin Taupe to define the eye socket and eye lid which adds definition and enhances your features. You can use whichever colour you like to define the socket, however darker shades are best. Browns, purples, berry and dark greens can all be used depending on your intended look and then we use a rich, pigmented, lighter shade to highlight and bring out your eyes.
 
I use the two brushes in the picture above. The bigger, angled MAC brush is actually one I got from Ebay believing it to be the MAC 275 medium angled shading brush. It turns out it's actually a fake but it does the job for me! The other smaller, purple brush is the Real Techniques Shading Brush.


I always begin with defining the browbone with the darker shade (satin taupe) in the position like above. I look straight ahead into the compact mirror and define exactly where the crease is. This acts as a marker and is the best way to tell where needs defining more.


By then looking down into your compact mirror, you are able to blend the original mark and add any extra definition to the crease. Going between these two positions enables you to make sure you have clearly defined all areas and really added some depth into the crease. I then take it slightly higher up the eye socket and over the lid, by simply using any excess left on the brush. This can be seen below.


The next step is adding the highlighting lighter shadow (phloof!) to the inner corner of the eye, like in the picture above. Simply begin at the tear duct and gently blend this into the darker eyeshadow, stopping around 1/3 of the way into the eyelid. I also add a small amount to just beneath the tear duct to really emphasize the eyes! I also add some extra of the darker shadow to the bottom eyelid on the outer corner. After a bit of practice, you can then use your angled brush to give a very subtle flicked out look, simply by using eyeshadow.
 
As with all make up looks, the best way to achieve a consistently fabulous look is practice, practice, practice! I squeeze in most of my practice by testing my technique for my work make up...after a while you look brilliant for work and have a failsafe method that will work every time.
 
I hope this is helpful!
 
Lots of love,
 
Hannah xxx