Creating the perfect 1950's eye make up comes from a little more than a flick of eyeliner and mascara. I really do believe in the power of establishing a perfectly contoured base so that the eyeliner really pops and perfects the look.
Whilst Marilyn went for a very dramatic sweep of eyeshadow to create her iconic look, I want to show you how to create the basis of your eye make up that is good enough for your everyday vintage look. It can then be built up for a more glamorous or evening occasion.
 |
| L-R MAC Pro Longwear in Always Sunny, MAC Phloof!, MAC Sable and MAC Satin Taupe |
My general go-to shades from these eyeshadows are MAC Phloof! and MAC Satin Taupe. This is a great combination for everyone to use as they are both rich, pigmented shades that can be built up to the intensity you want. As a green eyed girl, I use certain colours to enhance my eyes, for instance MAC Pro Longwear in Always Sunny and the slightly more copper shaded brown, MAC Sable.
I use Satin Taupe to define the eye socket and eye lid which adds definition and enhances your features. You can use whichever colour you like to define the socket, however darker shades are best. Browns, purples, berry and dark greens can all be used depending on your intended look and then we use a rich, pigmented, lighter shade to highlight and bring out your eyes.
I use the two brushes in the picture above. The bigger, angled MAC brush is actually one I got from Ebay believing it to be the MAC 275 medium angled shading brush. It turns out it's actually a fake but it does the job for me! The other smaller, purple brush is the Real Techniques Shading Brush.
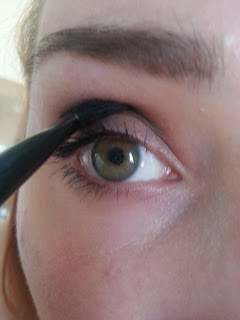
I always begin with defining the browbone with the darker shade (satin taupe) in the position like above. I look straight ahead into the compact mirror and define exactly where the crease is. This acts as a marker and is the best way to tell where needs defining more.
By then looking down into your compact mirror, you are able to blend the original mark and add any extra definition to the crease. Going between these two positions enables you to make sure you have clearly defined all areas and really added some depth into the crease. I then take it slightly higher up the eye socket and over the lid, by simply using any excess left on the brush. This can be seen below.
The next step is adding the highlighting lighter shadow (phloof!) to the inner corner of the eye, like in the picture above. Simply begin at the tear duct and gently blend this into the darker eyeshadow, stopping around 1/3 of the way into the eyelid. I also add a small amount to just beneath the tear duct to really emphasize the eyes! I also add some extra of the darker shadow to the bottom eyelid on the outer corner. After a bit of practice, you can then use your angled brush to give a very subtle flicked out look, simply by using eyeshadow.
As with all make up looks, the best way to achieve a consistently fabulous look is practice, practice, practice! I squeeze in most of my practice by testing my technique for my work make up...after a while you look brilliant for work and have a failsafe method that will work every time.
I hope this is helpful!
Lots of love,
Hannah xxx


No comments:
Post a Comment
I would love to know what you think! I will try to answer any questions as soon as possible. Hannah x