Showing posts with label Hair. Show all posts

Sunday, 23 March 2014

Late Forties Do's

Hello again everyone, I'm back with what is turning into my monthly blog post! Oops!

I just wanted to share some images that have been inspiring me recently. With tax year end/start chaos taking over my work life, I must admit that I have been far too tired and lazy to be setting my hair of an evening. Instead, I have become slightly obsessed with late 1940's/early 1950's fun updo's- isn't it nice to simply put all your hair on top of your head and forget about it for a while! Here I am attempting a bit of a poodle...


I found this 'do surprisingly easy to style. I firstly curled the longest pieces of my hair with curling tongs, and then pin curled them to set whilst I put my make up on. Once they were definitely cool I gently separated the curls and pinned my hair up all around my crown. The poodle pretty much formed itself, but required a bit of pinning to keep the curls in place. I used this beautiful picture of Rita Hayworth as my inspiration.

Todays 1940s hair and Makeup Inspiration from Rita Hayworth

Here are some of my other favourites that I hope to try soon...

Janet Blair <3 1940’s

Ida Lupino #hair #vintage #1940s

A thickly plaited wreath of hair. 1940s updo.

I also have quite an obsession with turbans too, as I mentioned on one of my last posts. I love this simple picture of Lucille Ball.

Lucille Ball 1941 - I really like this picture of Lucy, no glamour or glitz. Just Lucy, beautiful.

And finally a little outfit picture...


I would love to know what is inspiring you as Spring approaches!

Hannah xxx


Thursday, 6 February 2014

New Hair!

I admit it, I very rarely can be bothered to get my hair cut. Who can face it when you can just do a tighter set, or try a few new styles?! I am afraid that I had left it for far too long and the ends of my hair had gone rather haywire. It all began by looking at far too many pictures of early 50's Marilyn and watching lots of Call The Midwife; it was safe to say that I was full of inspiration for a new 'do.


Marilyn Monroe by Milton Green


Grace Kelly timeless beauty x  Our beautiful Gracie - a true #princess

Mamie Van Doren
Stunning Mamie Van Doren
Is it not pretty obvious I am also tempted by a colour change too?!

I decided to be good and stay red, however lost a good two inches of hair! 


It certainly feels much better and I can suddenly get back to setting my hair without ending up with a dead arm! I am quite tempted to take it a little shorter still...we shall see! 

Hannah xxx

Friday, 25 October 2013

Pin Curl Setting Styles

Normally a complete rollers enthusiast, it takes a lot to persuade me to try a different setting technique! I stumbled across these 'Hollywood Hairstyles- and how to do it yourself' guides, which even show how to get some of our favourite Golden Era Gals' do's.
 
These techniques are all done by a Pin Curl set. To roll a pin curl, take your strand of hair that you wish to curl, give it a spray (or three) of setting lotion and comb it through. Pinch the hair between your thumb and index finger, then make a loop using your other hand and roll the hair up the head. Clip it into place with two crossed Kirby grips and your are away! Just ensure that you use the same amount of hair to get uniform curls! I find this tutorial from Vixen Vintage particularly useful.
 
I decided to use this Lauren Bacall tutorial as I am continually looking to perfect my Pageboy!
 
 
For once in my life, I made sure to follow the instructions exactly, and was SO pleased with the results. When I do my usual roller set, I am always pleased with the front but never quite achieve the back quite how I would like it. It seems like the pin curl method gets perfection! Please excuse the dodgy lighting of my flat (I really do hope my hair isn't two toned like it looks!) but here are the results...


I also found quite a few other techniques, I just need to decide which to try next!


I think this (above) would create the ultimate Betty Grable look in Pin Up Girl!

 
Which is your favourite? Let me know in the comments below or on Twitter (@ABrightonBelle_)
 
Hannah xxx


Saturday, 14 September 2013

Goodwood Revival 2013

Sit down with a cup of tea and prepare yourselves; this is going to be a seriously picture heavy post!
 
On Friday, after months and weeks of preparation, we set off to Goodwood! After a well documented (via Twitter) jacket nightmare, having it been held up for almost a month at Customs, it finally arrived and I could put together my look. A huge forties fan, I was desperate to put together a classic outfit that represents my style, but was within my modest price range! I decided to wear my own interpretation of the Dior New Look that came out in 1947.


And here is my version...
 
 
Jacket: Black Rock Vintage on Etsy
Blouse: Charity Shop
Skirt: Zara (3 years ago!)
Shoes: Ebay
Bag: Vintage Hobbs
Beret: Charity Shop
Brooch: Bobby and Dandy, Hove
 
I even found the perfect Dior New Look shape straw sun hat, whilst on holiday in Suffolk, however the decidedly rainy weather called time on those plans. I decided to go for a Beret and a pageboy set, Lauren Bacall/Nina Foch style.


It is the first time that I have worn a beret and I must say that I loved it!
 
Here come the pictures...
 
Super amazing Tesco's stocked with goods in original packaging

Brown sauce anyone?!


My boyfriend wishing this was his

 
I had such an amazing time, it really was quite overwhelming to be surrounded by such an incredible amount of everything that I love! I suppose that I am so used to searching out vintage in a charity shop, or seeing what a vintage fair has to offer, that miles of clothes, cars and just hours of people watching was just amazing. I really wish we had bought tickets for all three days so that we could see the finals of the racing, and spent more hours immersed in the atmosphere. The only problem has been my seriously achy legs the day after!
 
Have you been this year, or any previous years? I would love to see some of your pictures!
 
Hannah xxx
 

Saturday, 17 August 2013

The Pageboy Tutorial

Ever since I used curling tongs to create a lovely Pageboy hairstyle, I have been determined to teach myself how to do the same style but by setting, a much more hair friendly method. Like all vintage setting styles, practise makes perfect but I have found this quite an easy one to do as there are only six sections to set. I use rollers to set my hair, rather than pin curls as I must admit that I still have to master that technique! Rollers give a great heat free styling option that works every time once you know where to put the rollers to work for you.
I must also add that when I compare pictures of my Pageboy done by a set and curling tongs, the set picture looks much more authentic!


To begin the set, separate the hair into six sections. This can depend on how thick the hair is, but I do have very thick hair and this method works fine.
Part your hair as you would normally. I always begin with the smaller side which my fringe isn’t on as there is normally a little bit less hair.
  1. Section One: Hair from just in front of the crown parted diagonally to the point at the tip of the ear.
  2. Section Two:  I imagine a vertical line down from the point near the crown that I began section one from, to the hairline at the base of the neck.
  3. Section Three:  A semi circle of hair around the crown that will mainly be backcombed
  4. Section Four:  A rectangle underneath the hair in section three.
  5. Section Five:  Take the hair out that will be in your fringe and part in a similar way to Section One.
  6. Section Six: This should be the remaining hair just behind the ear on the fringe side.
 I use rollers that I recently bought from Boots for around £2 (these are them!). I add a large foam roller for the section at the crown as this gives a looser set to get the dramatic U shape of a Pageboy set. Don’t forget a spray or two (or three!) of setting lotion before putting the rollers in!
 
Now comes for the scary bit, adding the rollers. My top tip here is to really think about the end result when adding the rollers. Think of the classic U Shape of the pageboy and roll the hair to recreate this. To put the rollers in Sections One and Two, I roll the hair upwards with the plastic bit of the roller at the bottom.  I like to end up with the rollers fastened in place vertically to almost create a ringlet once taken out later. I use the same technique for Sections Five and Six except I find it easier to have the plastic securing bit of the roller at the top, because I am right handed it helps me to secure the roller in really tightly. For Section Four, I do sometimes add two rollers, to continue the U shape well for both sides of the head, however it does work fine with one. Put the roller in, rolling it up underneath. I sometimes slightly twist the roller so that the hair is slightly more set to the side which has least hair. If I do this, I then add the roller for Section Three slightly twisted in the opposite direction to that of Section Four. I hope this makes sense! My thinking is that the U shape will be a continuation along the hairline, rather than the hair parting down the back and falling to each side.

Add a quick blast of hairspray and a headscarf and get some beauty sleep!
The beauty of this set is that it is relatively quick and easy to style in the morning as the curls are quite large and loose. Remove all rollers very carefully and I generally encourage the hair back into ringlets once the rollers are out. You should look very old fashioned with a head of ringlets! I then take a large round bristle brush and gently brush underneath the hair to loosen the set. I use my other hand (that isn’t holding the brush) to smooth and shape the hair up and under into the pageboy style. If you get any fluff, don’t worry, just keep brushing out and smoothing around and underneath and you will be perfectly pageboyed! A little backcombing to Section Three and sorting the fringe, however you would like seals the deal and you are ready to go!

I hope you find this useful, and would love to hear how you get on!

Hannah xxx

Sunday, 11 August 2013

Pride

Last weekend, the whole of Brighton turned into party central as it was the turn of Brighton Pride! I went out with the lovely Danielle of Daniella Christina fame, and we met up with fellow blogger Hayley of Vintage Vessel at The Black Dove at the top of St James Street where you can regularly find Hayley DJing every Saturday night. If you ever go here, I recommend you check out the extremely decadent and lavish downstairs, we certainly made the most of our surroundings with an impromptu few photos!


We decided to dress up in our vintage finery and celebrate in our style, vintage glam! I turned to my trusty wardrobe staples, a Collectif Dress and Vivienne Westwood Melissa shoes. It had been a hot day so I decided against the seamed stockings; however I was regretting my choice a few hours later as my feet were killing! Seamed stockings always save the day in the old Viv’s!
I embraced my inner Carmen Miranda/Betty Grable with my hair, creating a range of victory rolls on top of my head for an updated poodle style. This not only covered my outrageous roots but was a really easy style with the help of my latest purchase, 1940's Hairstyles. I took on a slight bit of the rainbow theme with an assortment of flowers pinned in my hair. I bought these one early morning at Brighton Marina Boot Sale where there was a stall selling a range of beautiful haberdashery. These were cards of 12 flowers for a pound each, so I snapped up two cards of Pink and Yellow flowers. They come with flexible metal legs which slide easily into your hair then can be securely attached with a Kirby grip or two. It was a great style for a warm evening as it was lovely to have all my hair out of the way for a change; normally I am worrying about my set dropping! I have also been wearing this non stop in the warm, sunny days that we have been having.
 
There is another great look in my new book, which incorporates a French twist with flowers hiding the join. I think I shall be trying that one out next!
Have a lovely weekend,
Hannah xxx

Wednesday, 31 July 2013

1940's Hairstyles- A Book Review

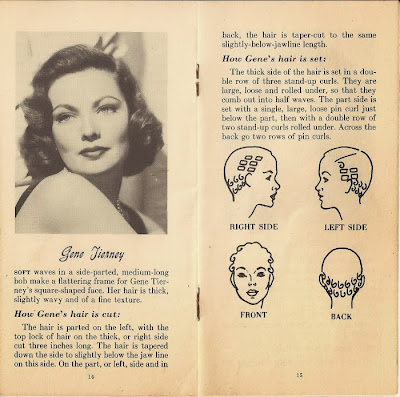
A rare decision to tidy up a box of ''important things'' lead to me making a great discovery...some Amazon vouchers! I decided to treat myself to a few things that I have wanted for a while, in particular this book, 1940's Hairstyles by Daniela Turudich. With beautiful Gene Tierney on the cover, how could I ever resist?!

 
The book begins by covering the basics, from the different styles that hair was cut into to create the best set, to pin curl tutorials to form the perfect rolls, poodles or pompadours. It details how the forties hairstyles focused on detail at the front of the head, and has beautiful pictures to demonstrate some of the amazing looks of the day. It describes the different methods in which you can get perfectly coiffed, from exactly how to 'fluff' your hair or how to set it to create a reverse roll. I think I will have to give some techniques slightly more practise yet though!


I think this page below features the hair of my dreams, look at the pageboy on the top right!
 
 
Of course when I reached the page with Gene Tierney AND Lauren Bacall on, I was completely sold
 
 
It even reveals some of best tips of the day used by Hollywood studios to conceal and camouflage any imperfections. I definitely studied this page for a while and was amazed with how the most subtle alterations can seriously conceal a range of flaws!
 
 
At the end of the book, there are a few pages explaining how to authentically accessorise a hairstyle, with flowers, bows, ribbons and much more. Another favourite section gives a few ideas for 'Career Girls'. As a vintage girl through and through, I dress 'vintage' all of the time, and really enjoyed getting a few more ideas of how to create an authentic but professional vintage hairstyle for every day.
 
 I have found it to be incredibly inspiring! It is more than a simple tutorial book, reading more like a reference guide. Modern day methods are acknowledged, such as curling tongs, but it also suggests techniques that have worked since the forties to emulate the same styles. I am potentially being a vintage snob, but I love learning the 'proper' way to style my hair as I really do believe that the old techniques work best. Great quality pictures of forties models provide much better inspiration than Google Images or Pinterest (dare I say?!) and so I am very happy with my purchase.
 
Have you got this book? It is a bargain on Amazon too so I would definitely recommend you picking one up!
 
Hannah xxx

Saturday, 27 July 2013

Headscarves and Beehives

Another addition to the vintage hairstyling posts of late is another easier style to pull together. This is a very frequent look that I wear. It is really easy to do, hides a multitude of grease/freshly washed hair sins and maintains a great fifties look. 


The key to mastering this look is the right amount of beehive, with a small French twist at the back. I scoop my hair into a roll with my right hand, and use my left hand to pin it in place. I tend to do this style in freshly washed hair, as you can just shove as many pins in to hold everything in place and get a days wear ready for a good set. The fringe requires slightly more modern day styling; those faithful curling tongs and plenty of backcombing and hairspray! I then roll the longer fringe bits into a small kiss curl and off I go!
 
I seem to be collecting a lot of headscarves, and buy most from Boo Boo Kitty Couture. They are quite honestly the perfect size, colours and material to get a great look very easily!
 
I recently bought a 1940's hairstyle book and am trying a few of those looks out, keep your eyes peeled for another hair post coming soon!
 
Hannah xxx

Monday, 15 July 2013

Bumper Baby!

Since watching How to Marry a Millionaire, I have been obsessed with everything Betty Grable! From her hair and make up to incredible legs, I have been really inspired by her. I stumbled across this image of her and was struck with inspiration and decided to try a modern replica of this look.


I decided to try a loose set with a more modern bumper bang and headscarf. The standard bumper bang look is widely recreated in vintage circles, but it is a look I have struggled to replicate! I was using a hair doughnut, purchased from Boots and really struggled to catch all of my hair in the roll. A trip to Simon Webster Hair later, and I had it sorted! It seems the doughnut that I was using was far too big and so I wasn't getting as tight of a roll as I needed. They recommended that I buy one of those and cut it in half. The right sized doughnut that I now use is pictured below.


I find that this style works better on greasier hair (as do vintage styles) as the hair has lots more hold. To form the bang, separate the hair like in the picture below. I find it best to stop slightly before you reach the crown to ensure that there is still some volume at the back.

Please excuse my hair fresh out of the set!

Then comes the tricky part. Take the doughnut and roll the hair under, as you would with a long foam roller. It may take a few attempts but hold out to get a great outcome! I ran a slight bit of pomade over the fringe I rolled up to keep any stray hairs in place. There is then a little multi tasking were you need to hold the fringe in place but also secure each end of the roll with a long pin me down grip (click here to see). Once the ends are secure you are free to let go and pin away. To cover the ends of the doughnut, simply slide the hair along and you may need to pin some looser bits down. Once everything is secure, you can gently press on the bang to bring it slightly lower down the face.
 
Add a sweet headscarf or bow for a fun look perfect for the summer days!
 
Ta Da!
 
 
 Good luck, and I would love to see your attempts! Tweet me @ABrightonBelle_!
 
Hannah xxx