Showing posts with label 1950s. Show all posts

Thursday, 6 February 2014

New Hair!

I admit it, I very rarely can be bothered to get my hair cut. Who can face it when you can just do a tighter set, or try a few new styles?! I am afraid that I had left it for far too long and the ends of my hair had gone rather haywire. It all began by looking at far too many pictures of early 50's Marilyn and watching lots of Call The Midwife; it was safe to say that I was full of inspiration for a new 'do.


Marilyn Monroe by Milton Green


Grace Kelly timeless beauty x  Our beautiful Gracie - a true #princess

Mamie Van Doren
Stunning Mamie Van Doren
Is it not pretty obvious I am also tempted by a colour change too?!

I decided to be good and stay red, however lost a good two inches of hair! 


It certainly feels much better and I can suddenly get back to setting my hair without ending up with a dead arm! I am quite tempted to take it a little shorter still...we shall see! 

Hannah xxx

Friday, 28 June 2013

Madam's Vintage

There's a new Madam on the scene and she wears fabulous glasses! Madam's Vintage has been taken over by vintage lover and fellow blogger Alex, of The Forties Floozy. Her great clothing taste has extended into her spectacle collection and I think it's fair to say that we are now well and truly spoilt for choice in the glasses department!
 
Fifties frames a plenty, you can find everything from sunglasses to the classiest, engraved frames in a range of colours and shapes. It doesn't stop there, she also caters for the men out with there with a variety of fade and tortoiseshell frames! Alex is happy to help and discuss your needs, send more pictures or source something particular you may have in mind.
 
There is also a very useful 'Swapsies' idea- if you are bored of your existing frames and fancy a change, Madam's Vintage can work out a way to swap your current frames for some new-old ones and use your old ones as a discount!
 
Brighton people, please allow room on the pavements for one vintage lady running to Specsavers for an eye test to renew that prescription! I promise I haven't been purposely squinting...
 
Here's a selection of some of my personal favourites
 
Hannah xxx


111-metal (2)
Marilyn
141-metal (2)
Cynthia
 

166-full metal (2)
Peggy

Delores


Sunday, 2 June 2013

Sunday Best


With a visit to a Vintage Fair on the cards, I decided to get my Sunday Best out. The sun was shining and I thought it a perfect opportunity to debut some recent purchases.
 
I recently got this Dollydagger Strawberry Picnic Bustle Dress, and have to say that I love it so much that I have been wearing it everywhere.  The neckline is very square which reveals a very demure amount of collarbone before gathering in at the waist. It is a bustle dress, so defines the waist and then 'poofs' out slightly to give a very flattering shape which I think is quite 1940's Dior New Look, like dress number 4 below. Dollydagger have some new designs coming in soon, with the same style dress but in a strawberry and gingham print which is below too.

 
I paired it with my new Rocket Originals Olivias, rose brooch from my previous post, vintage hat, vintage handbag and H&M cream cardigan. Both bag and cardigan are looking slightly worse for wear, and I was quite open to potentially picking up some replacements at the vintage fair but unfortunately it turned out to be a bit rubbish! It looks like I will be indulging my Ebay addiction again!
 
Hannah xxx

Wednesday, 15 May 2013

An Outfit Post!

A sunny day, and vintage fair to be visited called for a vintage get up! I don't know about you, but sometimes I seem to be stuck into wearing the same outfits. I suppose with wearing vintage every day, it is hard to mix it up a bit!

Top: Freddie's of Pinewood Norma Jean Top
Cardigan: H&M Mohair
Necklace: Hand me down from my Mum!
Belt: Leather plaited belt from H&M
Skirt: The Vintage Rogue
Shoes: ASOS
Bag: Vintage

 
I made the most of the fair weather to debut my latest purchase, my skirt from The Brighton Vintage Fair last weekend. I bought it from trader, The Vintage Rogue, who also had a stand at Wear at the Western Front. She has lots of lovely items and is slowly but surely filling my entire wardrobe! A quick look on her website, laureneva.com shows her styling credentials. If you give her an email at contact@laureneva.com, she will add you to her mailing list and let you know where she is next going to have a stall!
 
I also highly recommend you take a look at Freddies of Pinewood. They do great reproduction day wear and I am always desperate to scrape some money together to purchase more! Unfortunately it doesn't look like they sell my top from their website any more.
 
Lots of vintage love,
 
Hannah xxx


Friday, 19 April 2013

A Classic Eyeshadow Guide

Creating the perfect 1950's eye make up comes from a little more than a flick of eyeliner and mascara. I really do believe in the power of establishing a perfectly contoured base so that the eyeliner really pops and perfects the look.
 
Whilst Marilyn went for a very dramatic sweep of eyeshadow to create her iconic look, I want to show you how to create the basis of your eye make up that is good enough for your everyday vintage look. It can then be built up for a more glamorous or evening occasion.

L-R MAC Pro Longwear in Always Sunny, MAC Phloof!, MAC Sable and MAC Satin Taupe
My general go-to shades from these eyeshadows are MAC Phloof! and MAC Satin Taupe. This is a great combination for everyone to use as they are both rich, pigmented shades that can be built up to the intensity you want. As a green eyed girl, I use certain colours to enhance my eyes, for instance MAC Pro Longwear in Always Sunny and the slightly more copper shaded brown, MAC Sable.
 
I use Satin Taupe to define the eye socket and eye lid which adds definition and enhances your features. You can use whichever colour you like to define the socket, however darker shades are best. Browns, purples, berry and dark greens can all be used depending on your intended look and then we use a rich, pigmented, lighter shade to highlight and bring out your eyes.
 
I use the two brushes in the picture above. The bigger, angled MAC brush is actually one I got from Ebay believing it to be the MAC 275 medium angled shading brush. It turns out it's actually a fake but it does the job for me! The other smaller, purple brush is the Real Techniques Shading Brush.


I always begin with defining the browbone with the darker shade (satin taupe) in the position like above. I look straight ahead into the compact mirror and define exactly where the crease is. This acts as a marker and is the best way to tell where needs defining more.


By then looking down into your compact mirror, you are able to blend the original mark and add any extra definition to the crease. Going between these two positions enables you to make sure you have clearly defined all areas and really added some depth into the crease. I then take it slightly higher up the eye socket and over the lid, by simply using any excess left on the brush. This can be seen below.


The next step is adding the highlighting lighter shadow (phloof!) to the inner corner of the eye, like in the picture above. Simply begin at the tear duct and gently blend this into the darker eyeshadow, stopping around 1/3 of the way into the eyelid. I also add a small amount to just beneath the tear duct to really emphasize the eyes! I also add some extra of the darker shadow to the bottom eyelid on the outer corner. After a bit of practice, you can then use your angled brush to give a very subtle flicked out look, simply by using eyeshadow.
 
As with all make up looks, the best way to achieve a consistently fabulous look is practice, practice, practice! I squeeze in most of my practice by testing my technique for my work make up...after a while you look brilliant for work and have a failsafe method that will work every time.
 
I hope this is helpful!
 
Lots of love,
 
Hannah xxx

Wednesday, 17 April 2013

Bombshells in Berets

A recent charity shop suitcase purchase exceeded all expectations when upon opening it, we discovered a beret was inside the suitcase! It is in good condition and appears to be French made. A quick online search revealed the different ways in which berets have been styled over some of my favourite eras. I was inspired and vowed to encorporate it into my wardrobe. Despite the summer supposedly being around the corner, a beret will be a trusty tool to keep my set in place when battling against Brighton's sea breeze.


I love this androgynous thirties look by Marlene Dietrich. You can only imagine just how different and forward thinking this must have looked compared to the trends of the thirties. The beret adds a hint of allure and sophistication.

Some beret looks from my favourite eras, the forties and fifties can be seen below...


Nina Foch- I would love to emulate this style with a loose set or just pin curls


Lorelei (Marilyn Monroe) and Dorothy (Jane Russel) work two different beret styles in Gentlemen Prefer Blondes. I love the jaunty, inoccence of Lorelei's beret but Dorothy's padded beret not only suits her hairline but gives a subtle clue towards the contrast in characters of Lorelei and Dorothy.


Some red lipstick, a pout and tilt of the beret gives a sultry stare just like that of Lauren Bacall. The beret really is that cherry of top to give a seductive stare from underneath.

Hannah xxx

Sunday, 27 January 2013

A Guide to Vintage Shopping

Whether you are a seasoned vintage shopper, or new to the vintage lifestyle, a shopping trip for a one off beauty can be quite the unpredictable experience.

From my experience, the key lies behind knowing your body and what suits you. This means that you can then target clothes from specific eras that would particularly suit your body. You are then able to focus your time into searching for the perfect piece, rather than being disappointed in the changing room 10 dresses later! A vintage shop can spoil you for choice by the rows and rows of clothes, as they aren't organised like a high street shop which subconsciously guides you around by its Petite, Curvy or Tall sections.

The 1940's

In wartime Britain, the 'made do and mend' culture was present in every household up and down the country. The clothes were expected to be durable and practical but flattering enough to welcome the troops home with, so as a result a 'plainer' predecessor to the fashion of the fifties. For this reason, I often reach out to forties style for a more everyday, daytime vintage look. It is very easy to find a beautiful vintage dress for an evening out, but when you decide you want to embed this style into all areas of your life, it can be very difficult to know what to wear and for me, the forties fit the bill.
 
Necklines were slightly higher, skirts a little longer and waists were still defined so forties clothing would suit all body shapes. As austerity was key in the early forties, fabric was made the most of and styles followed the silhouette. Pleats and capped sleeves were everywhere. Christian Dior's New Look in 1947 signalled the change that was due to occur in a few years time as he unleashed the ultra feminine styles making a ready change from the boxier styles of earlier times.
 
Signs of the forties are Floral Prints, Trench Coats, Fitted skirts, Pillbox hats and Narrow Belts

The 1950's

The fifties is my go to era for the perfect party outfit. The beginning of pop culture changed attitudes all over the world and the clothes certainly reflected this. Styles became more exuberant, from poofy skirts, shorter hemlines or lower necklines. The sudden exaggerated shapes were almost done in an attempt by people to forget the compromises made in the decade before! Shapes symbolised sexuality, confidence and elegance.


Colour returned, and it was a huge trend to match your hat, bag and gloves. People gradually could afford to accessorise and it become all about what you wore, and what you wore with it. Daywear was slightly more comfortable and the fashion was for separates, such as the cardigan and capri pants inspired by Grace Kelly. Evening wear was centered around the Black Dress.

Signs of the fifties are: Circular skirts, Cats Eye Sunglasses, Capri Pants, Silk Print Headscarves and Beaded Cardigans

The 1960's

I am a great lover of 1960s style and design, and dreamt of being Jean Shrimpton for so so long. I had a moment of realisation when, after struggling to get into the 5th sixties style dress, I had to acknowledge that original sixties clothing neither fits or suits me!

Jean's short skirt causing controversy at Derby Day in Australia
In the sixties skirts got even shorter, as any 50's conservatism was being replaced by social change and development. The post war baby boom had bred a generation wanting to be different. The Mini Skirt symbolised this change, and the marketing by Mary Quant helped to secure this.

As the impact of the media directly influenced fashion, it brought about the rise of the mail order dress. Those lucky ladies were able to write to a newspaper, and be sent a Biba or Quant dress!

Telltale signs include: A-Line Dresses, Mini Skirts, Knee High Boots, Metallics and Crochet Dresses


.................
 
 
Whilst these decades may define themselves, we mustn't let them define us. I am by no way saying that somebody with a taller, less curvy figure wouldn't suit a forties style. I am simply highlightling the changes that developed during fashion over times. I really believe that you should dress to flatter your body, if you have a tiny waist or great boobs, don't be afraid to show them off! This is simply a guide to follow if you wanted to target a specific era, and may even help a little search on Ebay.  
 
I hope this has been informative, and please ask if you have any questions!
 
Lots of love,
 
Hannah xxx

Thursday, 24 January 2013

It's All About The Hair

The reddest lipstick, most flattering dress, or perfect brogues can all contribute towards creating a beautiful vintage look. However, the cherry on top is an authentic vintage hairstyle.

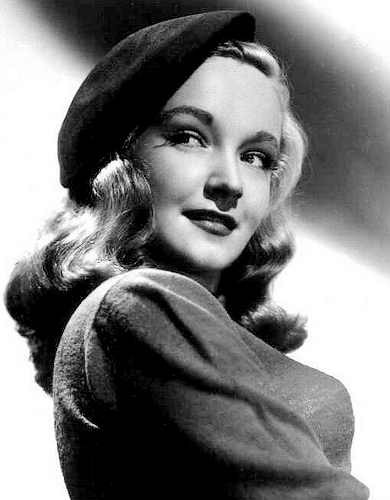
I am particularly inspired by the tumbling waves of Rita Hayworth, with her trademark sweeping fringe and gentle waves flattering her beautiful face!


As I have gradually encorporated vintage clothing into my everyday lifestyle, I have enjoyed styling my hair using an authentic 40's/50's method. Setting your hair is a more difficult technique to master, but the final result is much longer lasting and gives a great, glamourous look.

I begin with some cheap styling tools:
1. Superdrug Setting Lotion (around £1.60 for a bottle)
2. Bendy Rollers which can be found here. These are very cheap and also easily comfortable enough to sleep in. They come in three different sizes to create different size curls.
3. A Kent bristle brush. This is a more expensive option, but any natural bristle brush will give a great effect.
4. A medium sized square headscarf (available from any charity or vintage shops for a few pounds)
5. Kirkby grips

Before beginning to put the rollers in, I really think about how I want the style to end up afterwards. It really does take some thinking about, such as where to place the rollers, which direction to roll in and what angle to roll at. The setting lotion should be applied sparingly, but with particular attention to the ends to create a definite set curl. I apply it to each section before I roll it. I like to think of my hair as three separate parts.

Part 1: The Back

I want the style to be relaxed, with the hair will falling naturally from my crown, and the curls beginning in the nape of my neck. This means that I use the thinnest bendy rollers, to create the tightest curls. These are placed into the longest layers of the back of my hair. The medium sized rollers are then placed in the ends of my shorter layer of hair. I roll the hair clockwise up into the roots so that the curl flicks out rather than curls underneath. It is perhaps easier to understand from this picture!

The thinnest rollers are the pink ones

Part 2: The Fringe

In the picture of Rita Hayworth, you can see how her fringe sweeps up almost like a quiff, and then tumbles down. I love this style and think it is particularly glamourous to peep out from underneath! To understand how this is styled requires some experimenting. The hair needs to be rolled underneath, away from the forehead and is probably easier to understand from the picture below. You can see that the hair goes over the top and underneath the roller. The tightness of the curls forms the direction of the hair, but the weight of the hair and curl causes it to sweep into the fringe position. The section behind the fringe has to be curled tightly underneath towards the hairline to create a curl that falls straight down, for the main fringe section to rest on. Any misdemeanours can easily be corrected by some lovely curling tongs!

What a creepy photo!

Part 3: The Side Fringe and Behind the Ear

I use the medium (blue) and small (pink) rollers for this section to create defined but not too tight curls. I use the same principle as for the back where the underneath section of hair is rolled up onto the small rollers and the ends of my layers onto medium sized rollers. It is important that you roll these at an angle so that curl falls directly downwards.

This should all work, but unfortunately it does take quite a bit of practice! When all the rollers are in, add a headscarf to protect the set and then get some beauty sleep!

.......

The time taken to prepare the hair the night before makes for a very easy morning that doesn't take very long to style. Gently remove the rollers, I choose to do it in the three sections at a time.

When the rollers are out, use the natural bristle brush to carefully brush and loosen the curls. The most important bit here is not to panic! I have had many a moment where I can only see frizz, but keep brushing through for a few mintues and it will soon settle. It is now down to you to style as you like.

My favourite style is to pin the Section 3 (side fringe and behind the ear), just behind the ear so that the curls peep out from underneath a sparkly earring! It is also nice to add a lovely slide or hair brooch for an extra bit of glamour on a special occasion.

Here are some pictures of my favourite end results...


I hope this post makes sense and please, just ask if you have any questions! I am really excitedly planning some video tutorials to try and do this weekend so keep your eyes peeled! I would also love to hear if there is anything you would particularly like to see me do, whether it be hair, make up or anything else!
 
Lots of love,
 
Hannah xxx